The Hi-Lift Jack Buyer's Guide
When you're fourwheeling, getting stuck on the trail is part of the adventure. It's kind of part of the point of wheeling in the first place - conquering unconquerable obstacles.
But:
We all still want to get unstuck also! No one wants to sleep in their truck or leave it on the trail overnight.
And there's one cheap tool that can get you off of logs, out of mudholes, and above rocks:
The Hi-Lift Jack.
This can be one of your single-most important pieces of recovery gear if you don't have a winch. If you do have a winch, you can pair them together to make your off road recovery options go smoothly.
In this article, we'll take a quick look at the specs and applications of 6 models of Hi-Lift Jacks.
- The Best Hi Lift Jack Accessories
- The 5 Best Hi Lift Jack Mounts
- Use Your Hi-Lift Jack as a Winch
- All of them have the same weight-lifting capacities.
- The Heavy-Duty Clamp-Clevis is more versatile and stronger than the Standard one.
- Powdercoat and zinc-plated hardware will last longer than painted.
- All-Cast jacks will wear less than cast-and-steel jacks, so we prefer all-cast.
- LandCruising Adventure: World travels in a BJ45. Hi-Lift usage: "At times not for years. At other times daily, all depending on the area we traveled in."
- Desk to Glory: North, Central, and South America in a 1990 Toyota Pickup.
- Overland the Americas: 2012 Toyota 4Runner (North, Central, South America) and 2019 Land Cruiser 78 (Africa and Central Asia), both equipped with Hi-Lifts.
- Baja Taco: Toyota Tacoma in Baja
- Home on the Highway: North, Central, and South America in an '87 Toyota 4Runner. Hi-Lift Usage: "We have never needed to use ours (knock on wood) but if we ever need it, we will be glad to have it."
- The Road Chose Me: North, Central, and South America in a 200Jeep TJ.Africa in a 2011 Jeep JK.
- DON'T go under your 4x4 when it's jacked by a Hi-Lift.
- DON'T jack high unless you really need to. Strap or chain your axle to your frame if you need to lift a tire. It's easy to bend the bar if you jack high on the bar and sideload the jack.
- DON'T use your Hi-Lift to change a tire unless you need to. We prefer using a bottle jack under the axle, if possible.
- DON'T release the jack handle from your grip if lowering your load. If you need to release the handle, put the release lever in the up position and secure the handle so it's parallel to the bar.
- DON'T put yourself between the jack and your rig. If the jack falls or starts to slip, you can crunch fingers, or more.
- DO throw a tire, a rock, or a log under the axle or frame to catch your 4x4 if it falls off the jack. This is fourwheeling safety 101.
- DO maintain a "safety distance" around the jack. If the jack is 48" long, we keep people at least 48" away from the jack. That way, if it falls, it won't hit a human.
- DO anticipate that your rig may fall off the jack. If you need to use your Hi-Lift it's because you're in a tough spot. It's probably, slippery, muddy, rocky, or something so plan accordingly.
- DO set the jack properly when you pause raising or lowering.
The "rest" position for the jack is a) Release lever up b) Handle
locked parallel to the bar. The factory handle keeper is a little
cheesy, so we prefer a more positive handle keeper.
- DO use a Hi-Lift base when possible. This make a big difference in stability.
- DO make sure you have a secure grip in rain or mud. If the Hi-Lift handle is slippery, you can lose your grip and you'll have the handle flying at your face.
- Lifting
- Winching
- Spreading
- Clamping
- They're too short: You might be able to use your bottle jack on pavement, but add taller tires and uneven terrain and it'll almost never work for you off road. And no, rockstacking under a bottle jack is not a solution. The jack needs a stable base, not a tower of uneven rocks.
- You have to get under your 4x4 to use them: We advocate not going under your 4x4 if you're jacking it up off road. It's a safety thing we have about minimizing risk, kind of like "Never turn the key without your seatbelt on." You're usually a little stressed, the rig isn't on level ground, and if you feel rushed you're likely to make mistakes.
- They don't always have enough travel: You might get 8-10" of travel out of most bottle jacks. But even 36" Hi-Lift Jacks, the smallest ones, have 22.5" of travel
- They're truly difficult to use in some situations: Imagine that your rig is bogged down in a mudhole. You know that you can break the suction and get out by lifting your rig up. Would you rather jack it directly at the wheel or the slider OR crawl under it into the mud and do it with a bottle jack?
- The large runner, nose, and lifting mechanism have the same capacities across all jacks.
- The base is similar on all models except the First Responder.
- The bars have similar capacities, except for the upper sections on the 60" bars.
- All Hi-Lift Jacks have a shear bolt that breaks at 7,000 lbs.
- The UTV jacks have the same strength as any other Hi-Lift.
- The Xtreme, First Responder, and UTV jacks all have Hi-Lift's high capacity top clamp clevis.
- Hi-Lift actually says that the high capacity clamp clevis can be used to the jack's max weight. However, we think that realistically, it's going to be difficult for many of us to generate the required force on the jack handle.
- 36"
- 42"
- 48"
- 60"
- 60" jacks are hard to fit inside your 4x4 - probably impossible for Jeeps.
- If you have a bumper mount that stands your Hi-Lift up, it can protrude above your roofline and catch on branches.
- 60" jacks are awesome when you have a rig with a lot of travel.
- If you plan to winch with your jack, you'll reset less frequently with a 60".
- You can always cut down your 60" jack if you're not using all its length.
- Get a jack cover.
- Keep the climbing pins, springs, pivots, and lifting mechanism coated in penetrating oil.
- Store it inside your rig.
- Spray bomb it every once in a while.
- HL - The original, standard Hi-Lift
- XT - The Xtreme Hi-Lift
- PAT - The Patriot Hi-Lift
- FR - The First Responder Hi-Lift
- 36 - 36" bar
- 42 - 42" bar
- 48 - 48" bar
- 60 - 60" bar
- 4 - Cast and steel
- 5 - All cast
- The main jack assembly is powdercoated blue.
- The handle is powdercoated white.
- The hardware is zinc-plated.
- It includes a red handle keeper, which usually runs around $10 or so.
- 2 new climbing pins: These tend to rust and get stuck in the bores which makes raising and lowering "sticky".
- 2 new climbing pin cotter pins: These will rust, but this doesn't affect operation as long as they're solid.
- 2 new climbing pin springs: These will rust and could wear out after lots of use. They're thin enough that if they rust a long time the spring material gets very thin.
- 1 shear bolt: This can wear as it's a major pivot point.
- 1 tube of WD-40: We like to lube our Hi-Lift after every use. WD-40 isn't a great lube, but it's less messy than bearing grease or a can of lithium grease.
Table of Available Hi-Lift Jacks
See below sections for even more specs and descriptions on each of these jacks. A few notes:
| Standard All-Cast | Standard Cast and Steel | Patriot | Xtreme | First Responder | UTV/Side x Side | |
|---|---|---|---|---|---|---|
| Material | All-Cast | Cast and Steel | All-Cast | All-Cast | All-Cast | Cast and Steel |
| Top clamp-clevis | Standard | Standard | Standard | Heavy Duty | Heavy Duty | Heavy Duty |
| Hardware | Standard | Standard | Gold Zinc-Plated | Gold Zinc-Plated | Gold Zinc-Plated | Gold Zinc-Plated |
| Finish | Paint | Paint | Powdercoat | Powdercoat | Powdercoat | Paint |
| 36” available? | No | @Amazon | No | No | @Amazon | @Amazon |
| 42” available? | @Amazon | @Amazon | No | No | No | @Amazon |
| 48” available? | @Amazon | @Amazon | @Amazon | @Amazon | @Amazon | No |
| 60” available? | @Amazon | @Amazon | @Amazon | @Amazon | @Amazon | No |
| Notes | All-Cast will wear better | Least preferred because of the soft steel parts. | Donations made to charity, Comes with a plastic handle keeper | First Responder base | Cast and steel construction |
Do You Need a Hi-Lift Jack?
There are lots of people out there who don't and won't carry a Hi-Lift.
This is sort of a complicated thing to talk about, because people use their 4x4s in different situations. And in some of them, Hi-Lifts are unnecessary. They can easily be used in an unsafe manner.
So let's start with some actual overlanders that carry Hi-Lifts:
Overlanders That Use a Hi-Lift Jack
Here are just a few adventurers using Hi-Lifts:
Does every world traveler carry a Hi-Lift?
No.
Let's say you're going from Alaska to Argentina, a typical overlander trip. You can do this drive in a car. No winch is necessary, no Hi-Lift is necessary, no 4x4 is necessary. In fact, we've run into plenty of people who even drive to Costa Rica or Panama (the undriveable Darien Gap separates Central/South America) from the US in whatever crappy car they have.
But if you want to go further down some dirt road looking for scarlet macaws, or venture to a beach on the Baja beach that no one else can reach, that's where the self-sufficient recovery gear you have starts to matter.
How We Use Our Hi-Lifts the Most
Hi-Lifts can be used in many ways, but the fact is, most of us only want them for one reason: lifting.
There are two scenarios that we've used them for, more than anything else:
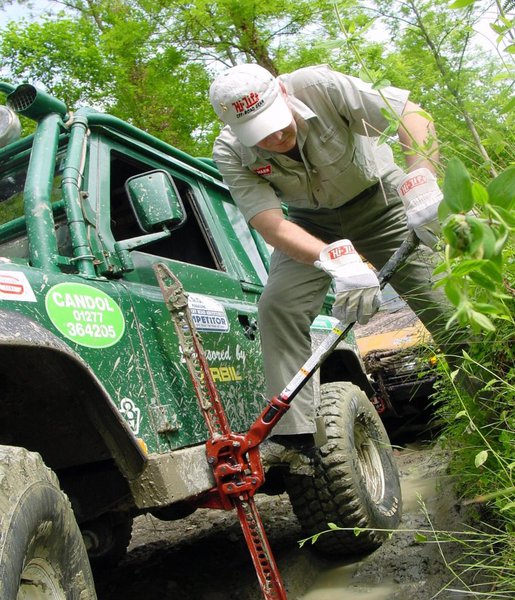
Scenario 1: Tire in a Hole
The first is when you've dropped a tire into a hole
and it's either lost traction or the axle is resting on the ground. This
most commonly happens in mud or extremely rutted trails, but can happen
on rocks, particularly depending on traction and whether you're locked.
We solve this buy jacking up the stuck corner and throwing
rocks and logs under the tire. Then we lower onto our new rock/log
platform and drive away. Sometimes, you need to jack and stack under
more than one tire.
If you do this, try to be mindful of other trail users:
Lots of wheelers don't like "rock-stacking" where you change the trail to make it easier. And if someone hits a mudhole at full speed, the log you left in it can damage their vehicle. So, don't be a jerk and clean up any trail-building you do.
Scenario 2: Rig is "Off-Track"
For Scenario 2, we're going to tell a story.
The manuever we used in Scenario 2 is extremely dangerous, but it saved our bacon once in the middle of nowhere (in winter!).
We were running a snow-covered trail near the end of the day in a Jeep Wrangler. We came to a decision point where we could either turn around and drive miles and miles back to a road OR we could follow the trail down a slope and drive slightly fewer miles out to a road. Going down the slope was a point "the of no return" - it was to steep to ascend if we needed to turn around.
Being adventurers (dummies?), we drove down the slope. We soon came to an even steeper slope that curved to the right. With no choice but to drive down, we drove and slid down that slope. We started getting sideways and stopped. The driver roof corner was jammed against a tree.
At this point it was getting darker and colder, and it was snowing. We'd ventured further than we should have and weren't equipped for a night out at 0° F.
Luckily, we had a Hi-Lift and a come-along.
Our solution?
We jacked the front bumper up and used the come-along to pull the Jeep sideways so that the jack flopped over into the snow. We were smart enough to give the setup a wide radius. After doing this a few times, the Jeep was clear of the tree.
Luckily, this worked, and we made it out without any more difficulties.
Why tell this story?
If there is a common theme for some of us, it's that someday we get into one situation that could have a terrible outcome. We enter into what start out as simple situations, and some bad judgment can make them complicated and unsafe. If you have it, recovery gear can be used in, uh, creative (and dangerous) ways, to get you out of a sticky situation.
Are Hi-Lift Jacks Dangerous?
100% yes.
Just like any other piece of recovery equipment, Hi-Lift Jacks need to be respected and used with
caution. Unlike other
pieces of recovery gear, some people seem to think that Hi-Lifts are so
dangerous that you shouldn't even use them.
But this is pretty silly, given
that there are numerous other things we do in fourwheeling that can kill
or maim us. Improperly used recovery straps and recovery points have likely killed far more people than Hi-Lifts, but no one says you should quit using them.
There are a couple of very particular dangers that a Hi-Lift has:
It is unstable. Of course it's unstable, right? It's a super tall jack with a tiny base. You can make or buy a base that will give you a little more stability, but Hi-Lifts are inherently unstable. That also happens to make them useful.
The handle holds a lot of potential energy when letting a load down. When the release lever is down and you're lowering, you need to 1) keep a firm grip on the handle and 2) keep the rest of your body out of the arc of movement of the handle. If you let go of the handle, it can drop, release the jack a notch, and rebound with jaw-breaking force.
Usage DOs and DON'Ts
Hi-Lift DON'Ts:
Hi-Lift Jack DOs:
Hi-Lift Jack Uses
You can't do this with a bottle jack!
Hi-Lift Jacks are perfect for off road extractions and can do several jobs that aren't just related to off road recovery. You should first know the principle movements of a Hi-Lift:
For fourwheeling, we're most interested in the lifting and winching motions.
If you think your Hi-Lift can't do something, take a look at the available Hi-Lift Jack accessories.
Chances are that you can find a way to make your jack work better with a bolt-on mod.
Why a Hi-Lift Is Better Than a Bottle Jack
We have re-evaluated the title for this section. It sounds a little inflammatory!
It's because Hi-Lifts are primarily for recovery, and bottle jacks don't work for recovery. But we will always carry both a Hi-Lift and a bottle jack on our outings.
Jacking up a 4x4 is the most common use of a Hi-Lift on the trail. Most wheelers use it to break a tire bead, change a broken axle, or some other thing that requires a corner of your rig to be in the air.
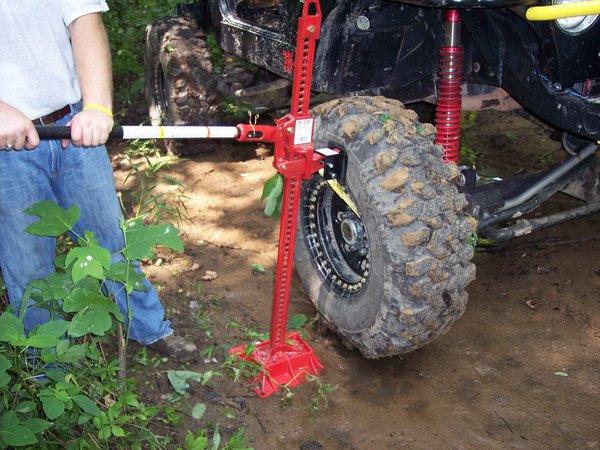
The Lift-Mate lets you lift directly at the wheel so that you don't need to max your suspension. The Off Road Base keeps your jack from sinking in the soft stuff.
Factory jacks and bottle jacks just don't cut it.
Why not?
And our last point really highlights when we think people should really be using a Hi-Lift.
Being able to lift a tire, or two, or all four, then stacking rocks, boards, or logs underneath can quickly get you out of a jam. It's a simple technique that is made easy by the design and amount of travel you get in a Hi-Lift.
And if you have a winch?
Well, this makes winching even easier.
Have you seen people struggling to winch out of a hole or against an embankment or a rock shelf? Sometimes they keep on winchin' and break a winch cable. With a Hi-Lift, you can give yourself some advantage by lifting a tire, stacking some rocks, and continuing to winch.
This is easier on your rig and your winch (this is doubly true if you have a cheap winch like the Smittybilt XRC 9500 - gotta baby it).
Using a Hi Lift Jack as a Winch
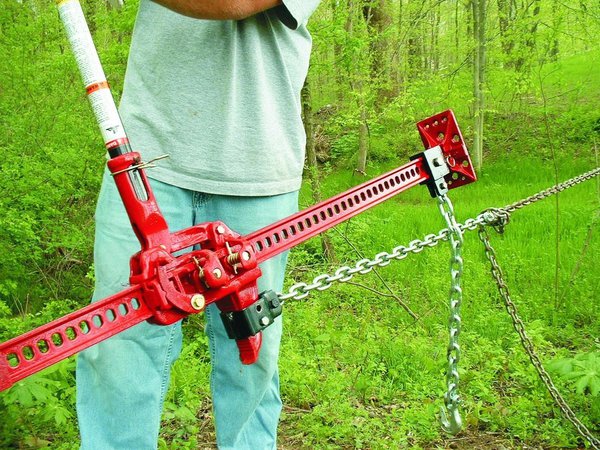
The winch gear attaches quickly and easily. The hanging chain near the jack base secures the jack while you reset it at the end of the bar's travel.
We're not gonna lie:
A Hi-Lift Jack working as a winch simply isn't as good as a real winch, but it shines as a stabilizing device in tricky off-road situations where a winch alone isn't enough.
You can winch up to 5,000 lbs with your Hi-Lift if you have the right setup. Hi-Lift sells a winch kit to make it easy.
Now:
If you're careful and use the appropriately rated steel and chain, you can make your own Hi-Lift winch kit.
The one that Hi-Lift makes is designed to allow the Hi-Lift to "travel" along a piece of chain. Each time you use up the length of the jack, you place a clevis hook on the pull chain, take the tension off the jack's nose, and reset it.
If you don't make or use the short tension chain assembly at the base of the jack, you can't reset it without completely stabilizing and securing your 4x4.
Hi-Lift Jack Specs
First, do yourself a favor and download the Hi-Lift manual:
Hi Lift Jack Manual and Parts List
Despite differences in bar size, color, and some materials, most Hi-Lift Jacks share very similar specs:
Most Hi-Lift parts are shared through the different models, which is why a UTV jack is specced mostly the same as an all-cast jack.
Hi-Lift Weight Capacities
The primary difference in weight capacities through Hi-Lift models is whether the jack comes with the heavy-duty top clamp clevis. If you already have a Hi-Lift, you can get similar gains and more functionality by using a Jack-Mate.
| All-Cast | Cast and Steel | Patriot | Xtreme | First Responder | UTV/Side x Side | |
|---|---|---|---|---|---|---|
| Shear bolt breaks | 7,000 lbs. | 7,000 lbs. | 7,000 lbs. | 7,000 lbs. | 7,000 lbs. | 7,000 lbs. |
| Max permitted weight up to 48" | 4,660 lbs | 4,660 lbs | 4,660 lbs | 4,660 lbs | 4,660 lbs | 4,660 lbs |
| Max permitted weight 48"-60" | 2,660 lbs. | 2,660 lbs. | 2,660 lbs. | 2,660 lbs. | 2,660 lbs. | NA |
| Max winching weight | 5,000 lbs. | 5,000 lbs. | 5,000 lbs. | 5,000 lbs. | 5,000 lbs. | 5,000 lbs. |
| Max clamping force | 750 lbs. | 750 lbs. | 750 lbs. | 4,660 lbs | 4,660 lbs | 4,660 lbs |
This ultra-strong clamp-clevis is used on the X-TREME, the First Responder, and the UTV jacks. It can hold more weight than the typical clamp-clevis and it has a chain slot.
Some interesting things up there:
What happens when the shear bolt breaks?
Probably not much. The climbing pins will still hold the load. You'll have to replace the bolt with one from the Hi-Lift Fix-It kit and figure out how to run your load differently.
Hi-Lift Lengths
The most confusing thing for many people is what length Hi-Lift you should buy. Your primary concern is probably running out of jack before you get the job done.
One thing that can really help is a Lift Mate:
It hooks on to your wheel so that you can jack directly at the wheel instead of maxing out your suspension then lifting the wheel. It's a lot safer than jacking the bejeezus out of your rig.
Hi-Lifts come in 4 different lengths:
All Hi-Lifts have the same minimum starting height: 4.5"
Check out our chart for the maximum lifting heights for each jack length.
For most offroaders, we'd pick the 48" or 60" jack. We see the 36" and 42" jacks as okay for UTVs, ATVs, and some stock 4x4s. If you're you're really in doubt, 48" is probably the most common choice and is plenty for most rigs.
| Bar length | Minimum height at nose | Maximum height at nose |
| 36" | 4.5" | 27" |
| 42" | 4.5" | 34" |
| 48" | 4.5" | 38.5" |
| 60" | 4.5" | 50 |
Here's the deal:
If you have bigger tires and a lift, everything is going to be further from the ground. A flexy suspension only makes it harder to get your wheel up. Using your jack at your bumpers and sliders is pretty common, so make sure you can reach them with whatever jack you get and still go higher!
Here's why you should get a 48-incher:
And here's why you should get a 60-incher:
All-Cast vs. Cast-and-Steel Hi-Lifts
Attention!
Many people think that the all-cast jack is "stronger" than the cast-and-steel jack, but that isn't exactly true.
The cast-and-steel Hi Lifts use 4 steel parts that are cast in the all-cast jacks. The cast-and-steel jacks have the exact same weight capacities as the all-cast jacks. The only difference between them is wear.
Steel is softer than cast, so:
The cast-and-steel jacks will wear out more quickly over time than the all-cast Hi-Lifts.
The cost difference is pretty minimal between the two. And yes, Jenna, when you try to save a few bucks by buying the cheaper jack for my birthday when you don't even know which is better even though this is life-saving equipment, I know.
Is there an aluminum Hi-Lift?
No.
Hi-Lift doesn't make an aluminum jack, and we know of no other company that makes any kind of aluminum farm jack.
Why not? There's probably some alloy of aluminum that would be just as strong as steel, but the amount of machining to make the jack would be cost-prohibitive.
Will My Hi-Lift Rust?
The nose, handle, handle socket, pitman, runner: after a while and with enough use, everything rusts on a Hi-Lift.
Yes.
There is almost no way around this unless you just live in a place where steel doesn't rust. So why do they rust and how we can slow it down?
This jack is all steel and steel rusts. Good stainless steel and aluminum don't rust but neither would be able to support the weight that a Hi-Lift jack can.
When you use your Hi-Lift off road, the large runner will scrape some finish off the bar (this is the long 36", 42", 48", or 60" piece) at the points of contact.
The same goes for the handle pivot, the climbing pins, the springs, and all the other parts that make the jack work. It's metal on metal contact, so there isn't any way around this.
But we're all wheelers, right? The Hi Lift Jack is a tool that we use off road, and our tools get a little banged up if we're using them.

This is completely typical wear on a Hi-Lift bar after a few years. You can't avoid it - it's metal on metal contact.
But:
We can slow this process down a little in some places. If you're worried about rust, you can:
We also always suggest bringing a cheap Fix-It kit
with you on the trail. If your jack's climbing pins are rusty, they'll
bind - this is very unsafe.
This is a common problem on the trail and is one complaint people have about their Hi-Lifts. Frankly, if you have this problem, it means you aren't keeping things lubricated enough.
Lube liberally and frequently!
You can replace rusty climbing pins on the trail easily with the Fix-It kit and some tools you should already have.
Deciphering Hi-Lift Jack Part Numbers
Once you're familiar with some of the Hi-Lift Jack specs you can decipher the part numbers. A typical part number is:
HL-485
There are 3 parts to the part number: the model type (HL), bar length (48), and material (5). Let's break it down:
HL - This is the model type. The Hi Lift model types are:
48 - This is the bar length. Each model types only comes in 2 or 3 bar lengths. There are 4 bar lengths:
5 - This is the material. Here there are only two options, but most Hi-Lifts are all cast:
So, for a 60" Xtreme cast jack, we get: XT-605. For a 48" First Responder cast jack, we get FR-485.
You can't just put part numbers together willynilly, but chances are, if you want a combo, you can come up with something that works for you.
Old Hi-Lifts Vs. Modern Hi-Lifts
The Lotus Development Hi-Lift tube adapter will not fit older Hi-Lift jacks as the nose length is too short.
Older Hi-Lift Jacks have a slightly shorter nose on the runner. It measures about 4", while newer Hi-Lifts have a 4.5" nose length.
For simple uses, this is not a problem.
However, there are new Hi-Lift accessories coming out all the time. Some of them secure to the nose/runner and are designed for the longer nose length.
If you really need to use a particular accessory, consider buying a new runner or a new jack.
Hi-Lift Jack Buying Guide
Which Hi-Lift should you buy? If you just want a plain Hi-Lift go with the 48" all-cast or cast-and-steel jacks. If you have a flexy suspension or want the extra travel, get the 60" version.
Of course, there are more options, like more strength, colors, or functions.
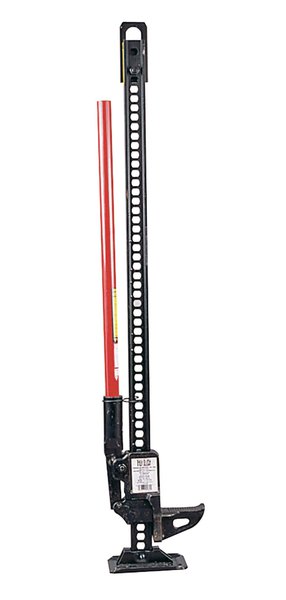
All-Cast Hi-Lift Jack
The all-cast jack is the classic Hi-Lift. The cast parts will last longer than the steel parts in the cast-and-steel jack.
Want the good ol' standard Hi-Lift?
This is it:
The all-cast Hi-Lift jacks are made of all cast parts. Since cast parts are harder than steel, it'll take longer to wear out than the cast-and-steel jacks. These jacks are all red. It comes in 42", 48", and 60" lengths. The factory top clamp-clevis is the "weak" one that can only clamp up to 750 lbs.
If you're choosing between the all-cast and the cast-and-steel, the all-cast is better and the prices are often almost exactly the same.
Get it here:
42" All-Cast Red Hi-Lift Jack - HL-425
48" All-Cast Red Hi-Lift Jack - HL-485
60" All-Cast Red Hi-Lift Jack - HL-605
Cast and Steel Hi-Lift Jack
These are supposed to be the "cheaper" Hi-Lift, but they're only a few dollars less than the all-cast. They are just as strong as the all cast, but the steel parts will wear more quickly.
Sometimes you can save a few bucks over the all-cast version of the Hi-Lift by getting the cast-and-steel version. While the all-cast version should last longer, for the average wheeler it probably doesn't matter to much.
Remember:
The all-cast and the cast-and-steel have exactly the same weight ratings and capacities. The only difference is the wearing of the parts, and that the cast-and-steel comes in black.
Like the all-cast, it comes with the "weak" factory clamp-clevis. Unlike the all-cast, it comes in one more size - so you can get a 36", 42", 48" or 60".
Get it here:
36" Cast and Steel Black Hi-Lift Jack - HL-364
42" Cast and Steel Black Hi-Lift Jack - HL-424
Patriot Hi-Lift Jack

The red, white, blue Patriot is all-cast and comes with a handle isolator. A portion of the proceeds from this jack go to charity.
Want to help out a good cause?
The all-cast Patriot Jack comes in red, white, and blue. It's just like the all-cast Hi-Lift, but has some upgrades:
The powdercoating should help with rust and be a little more durable than the paint on a normal Hi-Lift. Our red jack's finish lasted longer than our black jack's. We're hoping that the Patriot can do even better.
With each sale of this jack, Hi-Lift also donates to Hope for the Warriors, a nonprofit group that helps veterans and their families.
If you want to do some good and sport some red, white, and blue, the Patriot is the jack for you!
The Patriot comes in two sizes, 48" and 60".
Get it here:
Xtreme Hi-Lift Jack
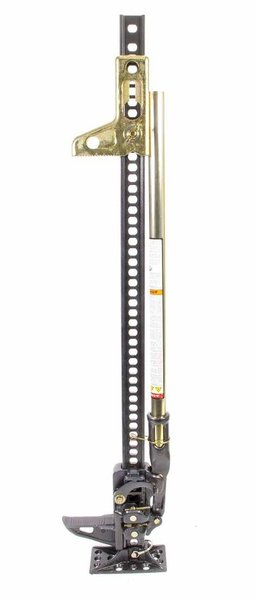
Besides the powdercoat finish and the gold-zinc plated hardware, the biggest improvement that this all-cast jack makes is the super strong top clamp-clevis.
If you're tired of the seeing red and black Hi-Lifts and you need something a little beefier, this is your Hi-Lift.
The bar, runner, and base are all powdercoated in a charcoal metallic finish, while the handle is powdercoated gold. The paint on regular Hi-Lift jacks comes off pretty easily. We're not expecting this survive metal-to-metal contact forever, but powdercoat should kick up the longevity a notch.
The two things we really like though, are the top clamp-clevis and the hardware.
The top clamp-clevis is a stronger version that is meant to fit in one position. The all-cast clamp-clevis, for instance, flips up or down whether you want to use the jack in winch or clamp mode. This is the jack you should have gotten for my birthday, Jenna.
The X-TREME version is thicker, bigger, and stronger than the standard clamp-clevis. Plus, it has a hole and slot to take a chain. This makes it even easier to winch with your Hi-Lift.
The hardware on this jack is gold-zinc coated. Typically, Hi-Lift hardware starts to rust pretty quickly. This hardware will rust eventually too, but it should take a lot longer than the regular stuff. This jack comes in 48" and 60".
Get it here:
UTV/Side by Side Hi-Lift Jack
These smaller jacks are perfect for UTVs and probably some stock 4x4s as well (although we recommend 48" for most 4x4s).
The UTV jacks are little jacks with big features!
This is crazy:
Although they are sized to fit on a UTV or a side-by-side, they're still made from the same components as other Hi-Lifts. That means they still have the same weight ratings and capacities!
These jacks also come with the same top clamp clevis that's on the X-TREME jack. We don't know why Hi-Lift put it on here, but we're glad they did!
The UTV Hi-Lift jack is available in 36" and 42" and is cast-and-steel.
Get it here:
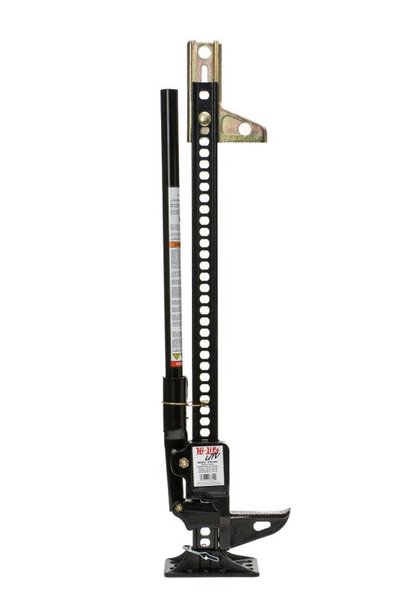
First Responder Hi-Lift Jack
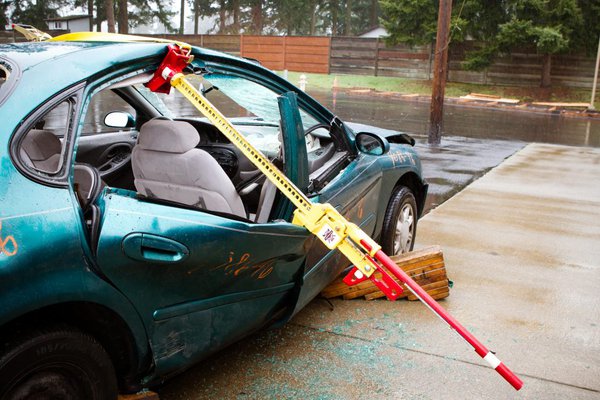
This is the First Responder in its element. Note the top-clamp clevis and the swivel base against the roof.
The First Responder is really intended for fire fighters and other first responders. It has the ultra strong clamp-clevis at the top and a specialized base that swivels.
Now, you probably aren't going to get this jack - it's a little crazy.
But who knows?
The First Responder Jack comes in 36", 48", and 60". It has a bright yellow and red powdercoat finish, plus some glow-in-the-dark tape to make it easy to see in the dark or at night.
This jack is all-cast. It's like an all-cast jack except for two big differences:
First, it has the strong, heavy-duty top clamp-clevis, like the Hi-Lift X-TREME.
But the biggest difference is the base.
The base is sort of a heavy duty upside-down reinforced channel. Most of the pictures you find of this jack show it being used in car rescues where the steering column has collapsed, a door won't open, or a roof is crushed inward. The channel base is well-suited to catching where it needs to to prevent the jack from slipping.
The base also swivels and locks into place so that it can be placed in the optimum position. We wonder if maybe a base like this could come in handy off road, but it would add some size and weight to your off road recovery kit.
Get it here:
36" Hi-Lift First Responder Jack - FR-365
Problems and Solutions
Hi-Lift Jack Won't Raise or Lower
A Hi-Lift that won't raise or lower is caused by corroded climbing pins. The pins get rusty and eventually won't travel in and out of their respective bores. There are short-term and long-term solutions for this:
I-Am-Standing-in-the-Mud Fix
The short-term solution is for when you are literally standing in mud up to your knees and you have nothing but a screwdriver. Pay attention:
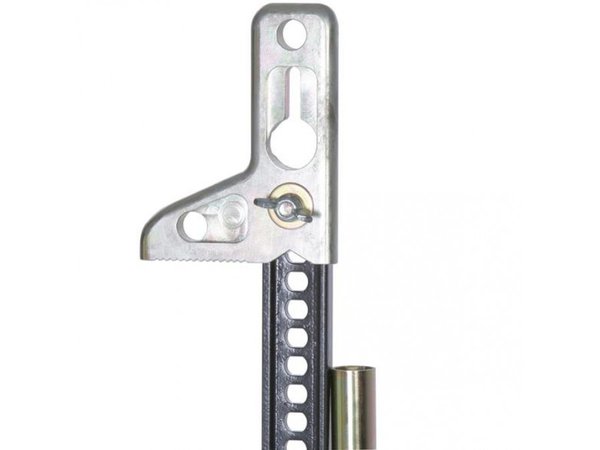
To go up or down, the climbing pins need to move in and out. When one climbing pin is out, one climbing pin is in and supports the weight on the jack. The runner (the thing holding your 4x4) can't move if the pins can't slide in and out freely.
Usually, all you need to do is pry between a climbing pin's cotter pin and the runner to shimmy the pin out. See the image to see the pry points. You might need to repeat this motion repeatedly, but this will get your Hi-Lift runner moving up or down.
If you have WD-40, motor oil, or other lube, get some on the climbing pins to help loosen them up.

Pry between a climbing pin's cotter pin and the runner to make the climbing pin pop out. You'll only need to move one pin at a time as the other pin will be supporting the weight. Also lube the climbing pin if you can.
Be very careful with this. If you're paying attention to the prying and not to the jack or the jack handle, you could injure yourself or others. It's best to find out that your climbing pins are working correctly before you have weight on the jack.
I-Have-Time-to-Fix-This Fix
You can replace the climbing pins with new ones very easily. They're cheap and easily obtainable.
Hi-Lift's Fix-It Kit includes new climbing pins, cotter pins, springs, a shear bolt, and some WD-40 in a tube.
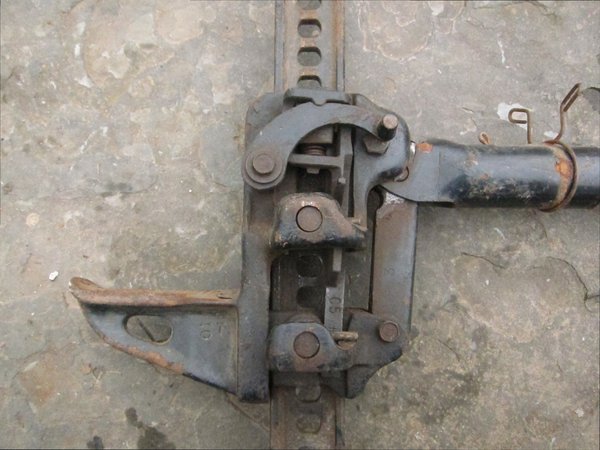
We carry a Fix-It kit in our recovery kit. If you're on the trail and have some tools, you can replace the climbing pins pretty quickly. The Hi-Lift repair kit looks like this:

These are the parts you'd typically need to replace on the trail.
Or You Might Have a Broken Shear Bolt

The shear bolt can break, which makes the jack handle useless. You won't be able to raise or lower your load.
This is also an easy fix using the provided bolt in the Hi-Lift repair kit. If you overload your Hi-Lift while jacking, the shear bolt will break.
For all Hi-Lifts, the shear bolt breaks at 7000 lbs. When this happens, the jack won't collapse or anything (the weight should be supported by the climbing pins), but you won't be able to raise or lower your load until the shear pin is replaced.
We recommend to use the Hi-Lift shear pin to stay within the design parameters of the Hi-Lift, and NOT to jam a random bolt or screwdriver in the hole.
To replace the shear bolt, you simply unbolt it and bolt in a new one - nothing special needs to happen here.
Hi-Lift says that you shouldn't replace the shear bolt under load. This is likely because you'll continue jacking once you've replaced the bolt, and it's pretty likely that you'll break it again.
Note that a shear bold breaking could be jarring to your load which could be a bad thing.
Is there a Hi-Lift Jack rebuild kit?
Yes, you can use the very inexpensive Hi-Lift Fix-It Kit to rebuild your Hi-Lift.
This kit includes:
Hi-Lift also specifically says NOT to use motor oil or grease to lube your Hi-Lift. This is probably because both will attract dirt and dust that will stick to and wear components. WD-40 leaves a much thinner film and is much less sticky.
Jack Stability and Bases
Stability of the Hi-Lift is one of its biggest problems, but sometimes you need that small baseplate. For times when you want more stability, take a look at these options:

Use it to keep from sinking into soft ground, sand, and mud. It's better than stacking rocks and can be used as a shovel if you're in a pinch.
The large off road base is strong, lightweight plastic. It works well in mud for increasing surface area and you can even use the jagged edge to dig.

This extra wide base plate makes your Hi Lift much more stable! Safe Jack also offers wide base plates for bottle jacks.
The Safe Jacks Hi-Lift Base gives your Hi-Lift a larger footprint and a lot more lateral stability than the standard skinny base. The imge really speaks for itself.
We don't see these stabilizer legs as being very useful for 4x4 use, but they'd make your Hi-Lift more stable for farm-type jobs.
Safe Jack Stabilizer Legs are probably not going to go in most of our recovery kits. This is probably too bulky for most of us, and would be difficult to fit on a rock slider.
But, if you need your Hi-Lift to be in a stable tripod position, this is the way to do it.
Last updated: December 4, 2019