Dimple Die Sets for Sleek Strengthening
Dimple dies take your fab work up a notch:
Using dimple dies in your fabrication is one of the easiest ways to cut weight and increase strength in your project.
We're going to take a look at a few dimple die sets, their materials, and their longevity.
Dimple Die Basics

Dimples can reduce the weight of gussets significantly by removing material.
Dimple dies have 4 main uses:
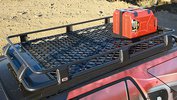
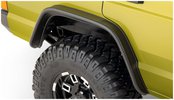
- Make flimsy sheetmetal stronger: By adding a bunch of flared holes to a piece of steel or aluminum you can strengthen it significantly.
- Make heavy parts lighter: By stiffening parts up with three dimensional flares, you can use thinner materials.
- Allow airflow: By punching a bunch of holes in a bracket, you can significantly increase the airflow through it.
- Looks: Dimpled parts look pretty good! Friends won't even notice your booger welds if they see some fancy dimples!
So let's talk real quick:
How do you get the longest life from your dimple dies?
It's not from using them dry and beating the crap out of them.
How do you use a dimple die?
You've got three options:
- A hydraulic press
- Tightening a bolt in a through-hole
- Using a knockout punch
You should pick how you want to use your dimples before you buy a dimple die set since not all dimple dies are set up to be used in all methods.
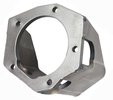
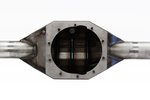
The big difference is that some dimple dies have a through-hole that goes right through the center of both dimpling pieces and some don't. If it DOESN'T have a through-hole you need to use a press. If it DOES have a through-hole, you can use any of the listed methods.
1) Dimpling with a hydraulic press (EASY BUT NON-MOBILE)
This is an easy way to use your dimple die.
- You drill a hole in the work piece.
- Lube the work piece and the die pieces.
- Fit the die pieces and work piece in your press.
- Press until the dimple is made.
This method has some pros and cons:
Pros:
- Works great if you already have a hydraulic press (they're handy to have anyway)
- Very low effort dimpling
Cons:
- Large work pieces might not fit between your press posts
- You can't dimple parts that are already welded onto your rig
- You need a hydraulic press.
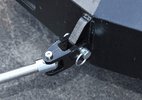
2) Tightening a bolt in a through-hole (CHEAPEST)
Shoot a heavy bolt (usually around 3/4"-1") through the through-hole in the dimple die and crank away till you have your flare.
This method works just fine:
Pros:
- Super cheap, you just need a big bolt/nut or two
- Can dimple already installed parts
Cons:
- Requires long breaker bars and lots of leverage for thick materials
- Lots of effort
- May require lots of space
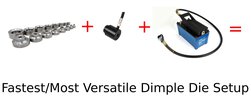
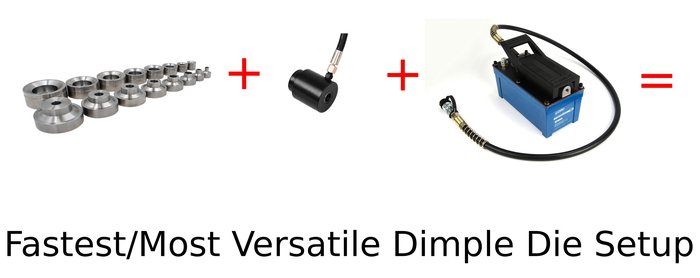
3) Using a knockout punch (MOST VERSATILE)

This is an easy, mobile way to use your dimple dies. Dimple die on the bench or on your 4x4.
Knockout punches are just another tool of the trade for electricians. The knockout punch method is like combining the through-bolt method with a hydraulic press. Luckily they're cheap enough to use for dimpling sheet metal.
They usually come with a bunch of punch tools that electricians use for making holes in steel boxes. You're just going to swap the punch tools for your new dimple dies and use the tool the same way. Get one here:
Knockout punches are manual, although they're pretty easy to use since you're just working a lever that works the hydraulics.
But:
If you're doing a ton of flares and want an easier setup you can get a pneumatically-powered hydraulic pump that'll let you make flares by hitting the foot-switch.
Pros:
- Can dimple already installed parts
- Very low effort dimpling
- Uses minimal space
Cons:
- Probably need to buy a knockout punch
How thick is the material to be dimpled?

Dimples add strength by making large flat areas more 3D.
The first thing you want to think about is the thickness of the metal
piece that you're working with. Obviously, thicker metal will wear your
dimple dies faster. Typical dimple dies are okay up to around 3/16" in
steel or aluminum thickness.
However, they'll last longer and
work better if you top out around 10 gauge steel (9/64" thick) or 11
gauge steel (1/8" thick). (FYI, gauge is actually a weight measurement,
not a thickness. Aluminum is a little thinner than steel at 10 gauge, so
you can go a little thicker.)
Dimples made in thicker materials tend to not look as nice as thinner materials. If you want clean-looking fab work, stick with dimpling thinner materials and figure out other ways to lighten and strengthen your thicker pieces.
How much space does a dimple need?
| Dimple die size | Flare (Dimple) OD |
|---|---|
| 0.5" | 1.2" |
| 0.75" | 1.45" |
| 1" | 1.95" |
| 1.25" | 2.4" |
| 1.5" | 2.7" |
| 1.75" | 3.17" |
| 2" | 3.4" |
| 2.5" | 4.2" |
Dimple dies are sold by the hole diameter. A 1" dimple die uses a 1" hole drilled in the workpiece. The flare is larger than the hole.
So:
Dimples are a the sum of the hole in the workpiece plus the flare around the hole.
What's the outer diameter of that flare? Take a look at the hole diameter vs. flare OD chart - basically how much space you typically need on the workpiece to make a dimple.
Make sure to drill a hole before dimpling
Some people seem to think that you can use "consumer" dimple die sets to punch and flare at the same time. Not so! The dimple dies here will not come with cutting edges.
If you need a dimple die set that both makes the hole and the flare, you're looking for a "Punch and Flare" set.
Dimpling is a two part process:
- Drill/Punch/Holesaw the hole (with your own drill bits)
- Flare the hole with a dimple die
Holesaws are kind of a pain to use - they're noisy, often seem to cut out-of-round-holes, and they're slow. If you've got cash to burn, you can pick up a set of knockout punches. These will make quick, fast holes that are perfect for flaring with a dimple die.
How big a hole do you need?
This varies per hole size, but the manufacturer will usually stamp the bit diameter on the side of the die.
Generally, the hole you drill will equal the dimple die size. I.e. a 3/4" dimple die requires a 3/4" hole.
Lube up the dimple hole
What do drilling, metal sawing, tube bending, and dimpling all have in common?
Metal-on-metal contact that deforms, shapes, or cuts metal. If you want to make your drill bits, saw blades, tube dies, and dimple die sets last longer, that's easy:
Add some lube to the tool and the work piece where they make contact.
For a hobbyist working in a garage, this doesn't have to be anything too fancy: we like motor oil, multi-purpose lube, and will use WD40 in a pinch.
Dimple Die Sets
There are some high quality dimple dies sets out there for fabricators. You might not pick one of these, but check out their features so you know what to look for.
RuffStuff Specialties Dimple Dies

RuffStuff's dimple die sets come in sets of three. This let's you buy in a size range without a huge investment.
RuffStuff dimple die sets are made for use with your hydraulic shop press ONLY. They have no through-hole, so that means you'll need to fit your workpiece on your press (No hydro knockout punch).
RuffStuff sells three different dimple die sets split across size ranges:
- The 1/2", 3/4" and 1" dimple die set
- The 1 1/4", 1 1/2" and 1 3/4" dimple die set
- The 2", 2 1/2" and 3" dimple die set
This is pretty convenient if you want to just test out dimpling - the small set is well under 100 bucks.
RuffStuff uses US bearing steel for these dimple dies and they are made in the USA.
SWAG Off Road Dimple Dies

The SWAG Offroad dimple die set is pricey, but you get a lot for the cash! First, this comes in a set of 8 sizes:
- 1/2"
- 3/4"
- 1"
- 1 1/4"
- 1 1/2"
- 1 3/4"
- 2"
- 2 1/2"
These dimple dies have a through-hole, which means you can use the through-bolt or hydraulic knockout method to make your flares.
They are made from USA 4140 chromoly steel and are machined in the USA.
The best part is the outstanding warranty:
If you can manage to split one, it'll be replaced free of charge.
Last updated: October 25, 2019