Toyota Brake Maintenance Tips

At current scrap prices, that will be about...tree fiddy.
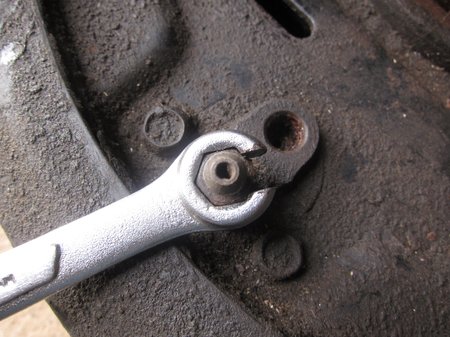
Use a 10mm flare nut wrench to break your fittings and bleeders loose.
As with the vast majority of fasteners, “righty tighty, lefty loosey”. Brake fittings and bleeders are often really difficult to get off. The metal they’re made of isn’t as hard as a the nuts and bolts that hold your Toyota together, so they’ll deform more easily if you aren’t careful. Your first try should be with a flare nut wrench. It is almost fully enclosed, but has an opening so that you can pass the wrench over the brake line. If that won’t work, hacksaw the brake line and put a 10mm box wrench on it. If you can’t get it on, use vice grips. One of these should work, unless you had water sitting in your lines, in which case you’ll need new lines, calipers, and/or cylinders anyway.

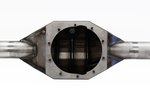
This contacts the bleeder evenly. Chances of rounding off the brake bleeder are low.
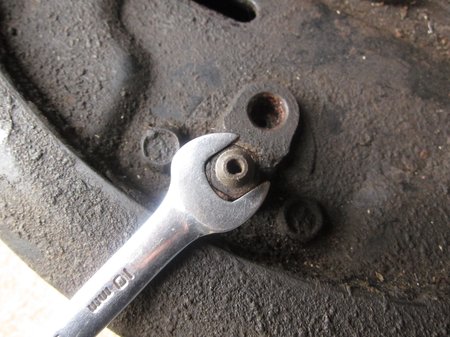
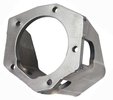
Terrible fit! Chances for rounding of this bleeder are high, especially if it's been sitting for a while.
This contacts the bleeder evenly. Chances of rounding off the brake bleeder are low.
Toyota Brake Line Size
When buying new hard lines for a Toyota 4x4, you want 3/16" brake line.
Toyota Brake Fitting Size
Toyota brake line fittings are 10mm x 1.0. Toyota bleeders are also 10mm x 1.0.
When you have ignored the above tip and used a (gasp!) open-ended wrench on your brake line fitting, thus rounding it off, you can buy pre-flared brake line from your local auto parts store that has the proper fittings. As an interesting side note, Toy brake lines use a wrench that’s the same size as the OD of the threads. This is different than a typical cap screw where the head is a couple sizes up from the thread OD.
Toyota Brake Flare Type
Toyota brake tube ends need a double flare, also known as an inverted flare. You should not confuse this with a bubble flare or a single flare. If you try to use bubble/single flares on your brake components they will leak. This also means that if you add a tee or a union anywhere, they also need to be of the inverted flare type.
To make a double flare you flare the tubing twice with a brake flaring tool (see below).
We have read that some Toys with ABS brake might have bubble flares on ABS-specific components. This is because these components were made by Bosch in Europe, and bubble flares are a European thing. So, if you mess with your ABS components, pay attention to the brake line ends.
Use a tube bending tool for bending new line, not your bare hands.
If you try to bend your brake lines into shape by hand, they will
develop flat spots and kink. Depending on the bend, you might be able
to bend them over a round object, like a pipe. But really, you may as
well just buy a tubing bender for a few dollars. You’ll make such nice
bends that you’ll briefly consider going into business as a brake line
tube bending artist. And your lines won’t kink.
If you decide you want to get into the big leagues, this tube bender will be a little easier to use and make more precise bends.
This tube bender will do a few different sizes of hydraulic tube and makes reasonably tight-radius bends. There are fancier tools available, but something like this will work fine for most auto enthusiasts.
Cut brake line tubing with a tubing cutter.
If you’re flaring brake line ends, you need a perfectly square,
burr-free end to make a proper double flare. You can get a cheap tubing
cutter that will work about as well as an expensive one. If you try to
use a hacksaw or some other freehand method, you’ll fail at
making a good double flare.
Get a tubing cutter.
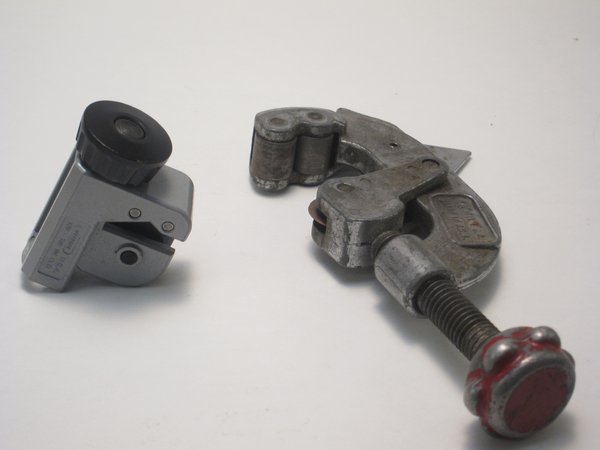
Either of these would work well for making a flare-ready, squared end cut on a piece of brake hard line. The cutter on the left is cheap, common, and the blade will last a while.
Use a double flare tool to flare your brake line ends.
Do not use a single or bubble flare tool on your brake line ends.
Single flares are insufficient, end of story. Cheap flaring tools are
incredibly frustrating to use and make bad flares. Bad flares make you crank your fittings. Cranking your fittings ruins them. Ruined fittings leak. Leaky fittings require new flares and fittings. It might be better just to do it right the first time.... You can can a decent flaring tool online or try flea markets to find an old kit with a good name. Some auto parts stores will also rent out tube flaring tools.
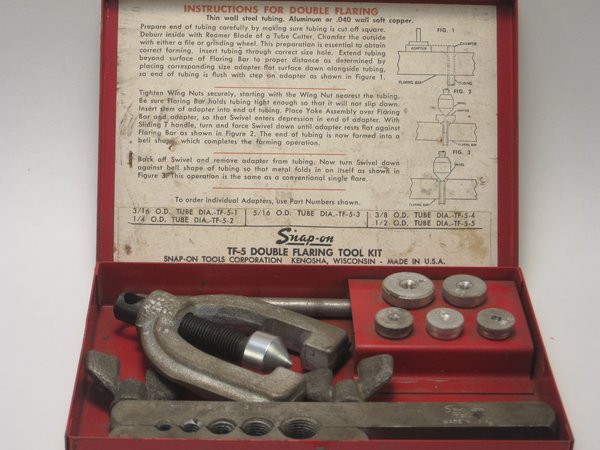
We picked this set up for around $40 used. It's worth it to spend a little more on flaring tools as cheap ones often don't clamp the tube properly, don't last, or make cruddy flares.
Mimic factory brake line bends to keep from stressing new hard lines.
You might be looking at the circles or crazy bends your hard lines make and think “What a mess. They should have made a straight run....” In actuality, this routing accounts for the flex between your body and frame and keeps your lines from being stressed. If you bend new lines, make sure that they can similarly flex.
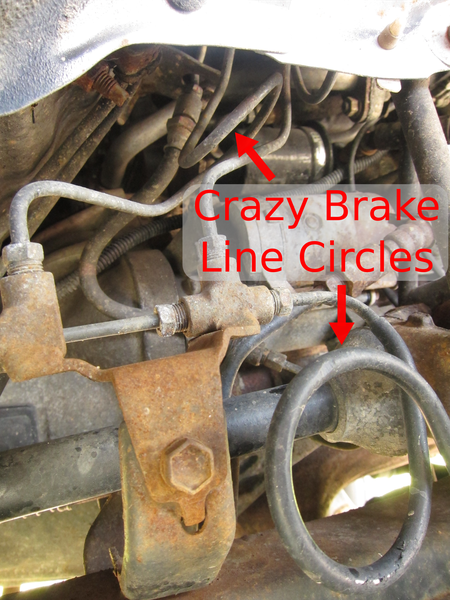
Those crazy loops are there for a reason - so that the lines can flex a little without stress.
Keep brake lines from chafing and watch out for sticks and parts falling off your truck....
This sounds dumb and obvious but crushed, torn, or leaking brake lines will not work properly and will probably result in brake failure. If a line routes through the body, make sure to isolate it from the metal. Secure your hard and soft lines with the correct tabs and brackets so that they aren’t flopping around. Make sure that if you run over brush or branches on the trail that they haven’t damaged your brake lines (this always happens at an inopportune time).
Did you go muddin’ or get dirty/salty?
When you hose off your truck, spend an extra 3 minutes and hose off your brake line fittings, especially at your wheels. Clean fittings will mean that they’ll be easier to loosen when you replace components or bleed lines. Future you will thank past you.
Brake fluid eats paint.
If you leave brake fluid on your paint, it’ll wrinkle your paint and make it peel. This happens quite quickly but there is a solution! Brake fluid is water soluble. This means that if you spill it on your truck, you can splash water on the affected area and you should be good to go. You should still throw a rag under especially sensitive areas. Take great care not to get water in your brake system if you do this. Make sure caps or covers are on, and fittings are properly tightened.
Toyota Brake Bleeding Order
You should bleed in order from longest line route to shortest line route (and the LSPV last).
Typically on a Toyota this order will be:
- Driver rear
- Passenger rear
- Passenger front
- Driver front
- LSPV (if you have one)
If you’re doing a full system brake bleed, there may be exceptions, especially with newer Toyotas. ABS systems may require you to brake bleed with your engine on and your engine off. Some newer Toys may “require” a special tool for bleeding, but you may be able to get away with the above procedure if you know what you’re doing. Check your manual and use your best judgment.
One Man Brake Bleeding:
Brake bleeding can be a pain if you’re doing it alone, but there is a cheap, easy way. The purpose of bleeding your brakes is to get air out of your brake system. You need:
- extra brake fluid
- a clean, dry container - fill it 1/3 or so full of brake fluid (some of this fluid will end up in your brake system)
- a length of tubing that will reach from the bleeder valve to the ground, clear works the best
- a 10mm flare nut wrench to fit the bleeder valve
- Place the 1/3 fluid-filled container on the ground under the bleeder valve.
- Attach the tube to the bleeder valve and submerge the end of the tube in the brake fluid in the container. The end of the tube must stay submerged for the entire procedure or you’ll suck air back into the system.
- Pop the cap on your brake master cylinder and get your extra fluid ready.
- Use the flare nut wrench to crack the bleeder valve open about a 1/4 turn.
- Slowly pump the brake pedal to the floor several times. While doing this monitor:
- fluid level in the master cylinder reservoir - keep it at least 1/2 full
- the fluid quality in the hose attached to the bleeder - you want no air or dirt - When the fluid is clean and clear of bubbles, that line is bled. Tighten the bleeder and move to the next bleeder.
Why does this work? Normally one person operates the brake pedal and one opens and closes the bleeder. This works like this:
- Brake pedal goes in.
- Bleeder is opened. Air comes out.
- Bleeder is closed.
- Brake pedal goes out.
- Repeat all steps.
The bleeder is closed before the pedal is released in order to prevent air from being sucked back into the system. With the one man bleeder setup, the hose is submerged in fluid, not hanging in the air. Therefore, having the tube submerged in brake fluid acts like a one-way valve. Air is expelled as the brake pedal is depressed and brake fluid is sucked up when the pedal is released and this is perfectly fine.
For the love of Toyota, it’s “brakes” not “breaks”.
According to Dr. Phil’s episode “Your Mom Has Two Kids and One of Them Is Your Dad”, you are hurting the brains of everyone that reads your forum posts when you spell “brakes” as “breaks”.
Last updated: June 3, 2019