The Guide to the Chevy 63" Spring Swap for Toyota Trucks, 4Runners, and Tacomas
Building trucks is expensive, especially lifting them. Toyotas are no exception.
You probably often wonder:
How am I going to lift this beast without breaking the bank?
Luckily, we Toy owners have the Chevy 63 leaf swap. By picking up some junkyard Chevy leaf springs and doing some welding and fab, you can get:
- Cheap, moderate height lift
- Loads of flex
- A comfortable ride
In this article we'll give you parts lists, measurements, and advice on doing the swap. You'll read about which years of springs to pick, how some Chevy springs are different, and some thoughts on how you should pick parts like U-bolt plates and shackles.
- Toyota Chevy 63" Spring Swap Kits
- Toyota Axle Widths
- Front leaf spring hangers
- Rear shackle hangers
- Shackles - (5"-6" long)
- Leaf spring pins/bolts - 1/2", 9/16", or 5/8"
- U-bolts - 5/8" x 10" long x 3" wide
- Spring plates
- Extended brakelines for your whole rig or just the rear
- Lower shock mounts
- Shocks - Measure first!
- Bumpstops
- Leaf spring bushings - '88-'98 poly or '98+ poly
- The Awesome, Soft Ride - They’re very soft and ride very well on a Toyota mini, 4Runner, or Tacoma. If you've got clapped out rear leaves (pretty common!) or add-a-leaves, Chevy 63s will be a night and day difference for you. Not only that, but they can still carry a load.
- Super Cheap Lift - Even if you buy the most expensive chevy 63 kit and 2 new leaf springs, you'll still have super-flexy rear lift for less cash than a conventional aftermarket lift kit. It only gets cheaper if you can fab your own parts and have a big parts pile.
- They Are Everywhere - Chevy springs are relatively easy to find since there are 1/2 and 3/4 ton Chevys and GMCs in every junkyard in America. You can find them on Craigslist on parted-out trucks and you can buy them new.
- Durability - Coming off a 1/2 ton truck and onto your 1/4 ton Yota, they will stand up to quite a bit of abuse, as long as they are set up properly and installed with bumpstops.
- Moderate Lift (Could be a pro or a con) - These springs will only give you 2-4” of lift. That said, these numbers are highly variable and the amount of lift you get can be a little unpredictable. You might end up with a thicker leaf pack or spring that have better arch than others. If you need more lift for your Toyota, you might need to augment these springs with longer shackles, short blocks, or add-a-leaves.
- Welding and Fabrication Required - At the minimum, you need to weld in spring and shocks mounts. If you don’t buy a chevy 63 kit, a fair amount of fabrication and sufficient tools are also required to build the hangers/shackles/spring plates and mount longer shocks. For instance, if you drill your own spring plates you’ll need a 1/2” drill (preferably a drill press) to drill at least 8 5/8”-3/4” holes for your u bolts, plus a 3/4” spring center pin hole.
- Hang Ups on the Trail - Because they’re long, they have a tendency to get hung up on trail obstacles a little more. In the front you can alleviate this by using ramped or frenched spring hangers. In the rear, you don’t have too many options. Therefore, your Toyota’s departure angle will be better than stock, but worse than if you used a shorter spring.
- Condition of the spring packs (are they beat?)
- How many leaves are in the spring packs (it varies)
- Whether you add or remove the overload and other leaves from the spring pack
- The weight of your Mini, 4Runner, or Tacoma
- The distance between the front spring hanger eye and the frame (lower eye = more lift)
- The length of your rear shackle (longer = more lift)
- The position and height of your rear shackle hanger (lower eye =taller)
- The height of your spring pads (taller = more lift)
- 1988-2014 Chevrolet 1/2 ton truck, 2wd/4wd
- 1988-2014 GMC 1/2 ton truck, 2wd/4wd
- 1988-2014 Chevrolet 3/4 ton truck, 2wd/4wd
- 1988-2014 GMC 3/4 ton truck, 2wd/4wd
- Shocks
- Extended brakelines
- Leaf spring bushings
- Front leaf spring hangers
- Rear shackle hangers
- Shackles
- Leaf spring pins/bolts
- U-bolts
- Spring plates
- Bumpstops
- Spring pad shims
- LSPV adjustment
- Remove the inner sleeve: Start by drilling
several holes in the rubber between the inner and outer sleeves, then
chisel/hammer out the inner sleeve.
- Remove the rubber: At this point you’ll have some
leftover rubber. You can burn it out with a torch if you’d like. While
this is fun for the first one it makes a lot of black, stinky smoke and
doesn’t really save that much time, so you might want to to try
chiseling out the rest of the rubber.
- Remove the outer sleeve: Once the inside is somewhat empty of rubber, you can use a hammer and punch or chisel to force the outer edge of the sleeve towards the center of the spring eye. Imagine that you’re trying to indent the circle that the sleeve makes. Once it’s indented enough, it’ll pop out with a hammer.
- Energy Suspension 3.2128
- Prothane 7-1017
- Daystar KG02023BK
- Pro Comp 69261
- Dayton RB-172
- Clevite 115090
- GM 15050270
- GM 15529515
- TRW B0362
- Automann MR590
- S & G RB-172
- Dallas RB172
- Flagg RB172
- Dayton RB-250
- a 3” span for the spring
- a ramp to help it slide over trail obstacles
- Toyota axle
thickness (3”) +
- Chevy leaf springs (3-4”) +
- spring plate thickness (1/4”-1/2”) +
- heavy washer (1/4”) +
- heavy nut (3/4”) +
- some extra thread (3/4”)
- People will laugh at you.
- You’ll have to grind the Chevy springs to fit everything together since they are wider than stock Toyota.
- Your u-bolts will be sticking down towards the ground, just like stock. This means that they will hang up on obstacles and get mangled (if they aren’t mangled already).
- You’ll only be able to fit 3 Chevy leaves. The stock Toyota u-bolts are not long enough to fit 3 leaves plus an overload, or 4 leaves plus overload.
- Weld some tube or something on your stock bumpstops and attach them somewhere.
- Bolt on new bumpstops.
- Run without bumpstops, but retain the overload leaf to keep the spring from going negative. This seems to work for some people, but some people still bend their springs.
-
You’ll still need to measure for shocks if you are not using a kit with shocks included. For a temporary solution on a daily driver, you can get away with using your stock shocks and stock upper shock mounts with a bolt welded onto your axle or spring plate acting as a lower shock mount. You should only do this as a stop-gap until you’re able to measure for proper length shocks.
-
It’s tougher to get the proper front and rear hanger mount locations. This is less problematic in a kit, since the measurements have already been figured out. To properly position the axle, it’s best to use a plumb bob on your stock Toyota setup to locate the axle center and reference it on your frame. Then you would pull out your old springs and mock up the new mounts and springs using the plumb bob reference in order to center your axle in the wheelwell. This is impossible to do with your stock springs installed, so you’ll end up making an educated guess.
-
Drop the tank: You can try to wait until your tank is nearly empty, then drop it and move it far away from your zone of fabrication. This probably adds 30-90 minutes for removal and installation, depending on the vehicle and how full your tank is.
-
Leave the tank installed and weld on three sides of the hanger: If your frame is in good shape, your welding skills are good, and your hanger is solid this will work fine. You can additionally drill some holes on the inside of the hanger and weld these holes up. These plug welds will strengthen the mount, but make it more difficult to remove in the future. You should still beware of welding closely to your tank and be absolutely certain you don’t have gas leaks or smell gas fumes before doing any welding, grinding, or firemaking in the area.
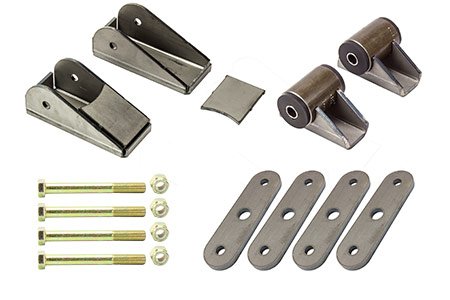
This is a basic kit that will get your springs hung. The rest is up to you! This is great if you already have a big stash of parts or you need a custom setup.
The 63” long springs (often referred to as 63” Chevys or similar) are durable and give a better-than-stock ride. They are a “bang for the buck” spring, meaning that using them gives you lots of value for a great price point. If you like inexpensive, simple solutions to lifting your Toyota truck, 4Runner, or Tacoma, this is a great solution.
You can fabricate most of the components yourself.
But if you want to make it easier:
Buy a very basic or very complete weld-in Chevy 63 swap kits to cut down on fabrication time so that you can do more wheeling.
Basic Parts List
Besides the springs, these are the basic parts you'll need to do the swap. Read about picking springs, plus our thoughts on these parts, below.
The Pros and Cons of a Chevy 63" Swap for Your Toyota
Just like everything else, there are good things and bad things about the Chevy 63 swap. The highlights are that it's cheap, soft-riding, and low-lift.
Pros of 63s
Cons of 63s
How much lift do Chevy 63” springs give you?
This is almost impossible to say. The average amount of lift appears to be around 2-4”. If you purchase a kit and use ‘88-‘98 springs (which are the most well known) the kit manufacturer usually lists the expected amount of lift. Factors that affect the amount of lift you get are:
You might be tempted to think that you can just tweak all the factors above to get a 12" lift. This would be dumb. The lower you drop the spring hangers, the more they'll hang up on trail obstacles. The more leaves you add to the pack, the less flexy it becomes. The taller you make your axle's spring perches, the more you'll have axle wrap. Just remember that there are always tradeoffs.
Where to Get Them
First, check your local U-Pull-It/Pick-and-Pull place. Our local
place has leaf springs for $15 each, so that’s $30 for the pair. If
they have a 1/2 price day or all-you-can-carry day, you can get an even
better deal. Next, check Craigslist, where you may be able to find some
enterprising individual parting out a Chevy truck with the leaf springs
you need, or maybe some chap that’s putting some 12” springs and 44”
Swampers on his 1/2 ton.
If that doesn’t pan out, you can try your local wrecker yards. Depending on your location, you should expect to pay $50-$150. If you absolutely need to buy them new for some reason, you can buy them new.
What Vehicles Are They On?
First, you want the rear leaf springs. They are often referred to
as being 62”, 63”, or 64” - but these are all the same leaf spring. All
of these springs measure 64” from eye center to eye center along the
arch. The spring pin is centered. There may be some variance which
will depend on the amount of arch the spring has, but the spring will
generally measure 63” in a straight line from eye center to eye center.
The late model springs have one leaf less than the early models. Since there are fewer leaves, the leaves in the late model packs are also thicker than those on early models. It’s possible that some of the more recent Chevy/GMC models are using more leaves, so be on the lookout for that. Vehicles that have the correct springs are:
| Vehicle | Number of leaves |
|---|---|
| Chevy 63", '88-'98, 2 wheel drive leaves | 3+1 |
| Chevy 63", '88-'98, 4 wheel drive leaves | 4+1 |
| Chevy 63", '99+, 2 wheel drive leaves | 2+1 |
| Chevy 63", '99+, 4 wheel drive leaves | 3+1 |
Some more recent leaf packs may have more leaves, but those represented in the table above are what you’ll most likely find in a junkyard. From the above table, you can see that 4 wheel drive Chevys have an extra leaf. You can leave it in or take it out if you end up with 4wd leaves. Many people run 3 leaves with an overload leaf, but this is dependent on your setup, how you wheel, what tires you want to run, and how much flex you want.
If you’re confused by the numbers in the table above, for the ‘88-‘98 2WD leaf packs, there are 3 leaves plus an overload leaf, which means there are 4 total leaves. You’ll often see this referenced as “3+1” or “3/1”.
What do you need for the swap?
People have done this swap for under $100. That said,
if you don't have a junkyard in your backyard and don't want to spend your life on Craigslist looking for deals, you'll probably need to spend more. We have sources for most of these Chevy 63" parts here. This is what you may need:
Here are some thoughts:
Longer Brakelines
You can get extended braided brake lines singly, or as a set of three to do the front and rear. Take a look at the some of our Toyota brake line info. You’re going to have a lot of extra travel, so you’re going to need these.
Longer Shocks
You can buy a kit that will have correctly sized shocks with mounts. With a kit, you’ll probably still want to flex your truck before you weld the mounts in. With a homebrew suspension, you’re on your own! You’ll have to install the springs, then get full extension and compression measurements for where you want to mount your shocks. Some have reused the stock shocks and upper mount, but this probably isn’t a good long term solution if you want max travel. Remember that you don’t want your shocks being the limiting factor in your suspension.
Leaf Spring Bushings
You should know the year of the truck that the springs come from before you buy other parts. Early springs have a different spring eye inner diameter than later springs and they also take a 5/8” bolt instead of a 9/16”.
Getting the Springs Off the Donor Rig
The Chevy leaf spring bushings in each spring eye consist of 4 parts: 2 rubber bushings, 1 metal outer sleeve, 1 metal inner sleeve. This might be unusual if you’ve only ever worked on Toys, but it’s a pretty common setup with domestics. The mounting bolts that hold the spring to the truck may be seized to the inner part of the bushing.
This is bad
for removal and you or the junkyard may have to chop off the mounts so
that you can deal with the assembly in your garage.
Even if the bolt
is seized to the inner bushing, you may be able to use a press to pop
the bolt out. If you can’t get the bolts pressed out, you may need to
drill, torch, and hammer the bushing assemblies out. This kills the
bushing and will require you to get new ones.
Removing the Stock Chevy Bushings
Removing the bushing is not a tough job - you remove the inner
sleeve, then the rubber, then the outer sleeve. Do it like this:
Chevy 63” Bushing Part Numbers
Stock-like replacement bushings will cost around $50 for both springs, or you can buy pairs of bushing for $10-15. One pair will do one spring eye and 4 pairs will do both Chevy springs. Front and rear bushings use the same part number. Full polyurethane bushing kits are also available, though you’ll end up with some extra bushings. The poly bushings have an inner sleeve but no outer sleeve. The outer sleeve is unnecessary with poly bushings.
1988-1998 Polyurethane Chevy Bushings
1988-1998 Rubber Chevy Bushings
1999+ Polyurethane Chevy Bushings
1999+ Rubber Chevy Bushings
2 Front Leaf Spring Hangers
You can make these or buy them. Your hanger needs 2 things:
The overall width of the Chevy leaf spring with its bushings is 3”,
which means that your hanger needs to have an empty 3” span.
You could
use a piece of 3.5”x3.5” x 1/4” wall square tube for this and cut out one
side. You could also use a wider piece of tube, like 4”x4” x 1/4”, which
will give you a 3.5” inner span, then space it with 1/4” thick spacers on
each side.
Since these hangers are mounted on the bottom of the frame,
they tend to hang on rocks and trail obstacles. To get a little extra clearance, some installers french the hanger into the frame. This just means that they cut a small section from the frame an nest the spring hanger into the hole. RuffStuff Specialties makes frenched hangers for Chevy springs that are almost fully boxed. These can be surface-mounted or frenched.
Rear shackle hanger
You can use the stock Toyota hanger with a double shackle setup, see below. If you build or buy a new rear hanger, it will mount behind your stock Toyota hanger due to the long length of the Chevy Spring. The Chevy springs take a 9/16” or 5/8” bolt. The Toyota shackle hanger takes an 18mm bolt. There is no ready made way to mate your Toyota shackle hanger to your Chevy 63” spring, nor is there an easy way to sleeve a 9/16” bolt to 18mm. The cleanest way (and the most common) to do this is to build or buy a new rear shackle hanger.
On some Toys, the part of the frame behind the shackle hanger is channel and isn’t fully boxed like in other areas. We suggest adding a plate to box this part of the frame or adding a crossmember for extra support.
Shackles
You’ll need to make or buy shackles. Shackles should be a
minimum of 3/8” thick. The standard length for Chevy 63s on a Toy is around 5". Since the Chevy leaves are so close to flat, you don't need a huge shackle to absorb the lengthening of the spring as it compresses.
The bottom will need need to be drilled to 9/16” or
5/8” for the Chevy springs and the tops will need to be drilled to 1/2”
if you’re using a common Jeep Wrangler spring bushing.
There are a few different ways that people do shackles. Some run an extra long (like 11”) shackle with the stock hanger, but we don’t think this is really stable enough for a truck that will see the road. Some people run double shackles ("missing link") setups that permit a significant amount of extra droop. Unless your double shackles are setup to prevent it, you can invert the shackles, which is bad. You can help this by using a double shackle kit with anti-inversion built in or by using a track bar.
Hardware
The Chevy bolts are either 9/16” diameter for ‘88-‘98 or 5/8” diameter for 99+. If you get a kit with shackle hangers, the shackle hanger bolt will be 1/2" or 9/16". Stock Toyota bolts are 18mm.
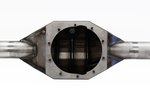
U-Bolts
This is your chance to install a u bolt flip kit! The stock Toyota setup for securing the springs to the axle is not ideal for fourwheeling. The U-bolts point downward, hanging up on the trail and being mangled.
Switching to normal U-bolts is an easy upgrade that gets you some extra clearance under your rear axle. You need 4 grade 8 u-bolts/washers/nuts and 2 sufficiently strong spring plates. The stock spring plates won’t work with a properly done flip.
The new U-bolts should be 3" wide, ever so slightly larger than the stock Toyota axle tube diameter. They need to be long enough for:
A 10" long, 3" wide, 5/8" thread U-bolt is a good starting point and can be easily cut down with a cutoff wheel if it's too long.
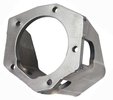
Spring Plates
You need two spring plates to hold the spring to the axle. You cannot reuse the Toyota spring plate - it just isn't big enough. You can build, buy, or go junkyard hunting for your new spring plates.
Buying or building spring plates
The rear springs in your Mini/4Runner/Tacoma are slightly narrower than the Chevy leaves and since spring plates are drilled to fit the u-bolt diameter (front-to-back) AND spring width (side-to-side), you’ll need spring plates with wider side-to-side spacing to fit the 2.5” wide Chevy 63s. Don’t skimp on these. They shouldn’t be cheapo plates stamped out of 3/16” steel. You can used reinforced 1/4” (strong and lightweight) or go to 3/8” or 1/2” flat plate. Make sure you have the drill capacity and willingness to drill 10 large holes through 3/8” plate steel or buy some premade spring plates.
Scavenged spring plates
Depending on the vehicle your springs come from, you may find spring plates that will work with your Toy axle. Many of the Chevys have a spring plate molded to the axle. While you might be tempted to use these plates and u bolts, know that you’ll end up with square u-bolts that stick down towards the ground, just like the stock setup. Spring plates that might work with regular u-bolts and Toy axles are Chevy Dana 44 and Jeep XJ. Check around the junkyard, and you may find something else that’s suitable. If you find something else that works, let us know!
Reusing stock Toyota u-bolts and spring plates - NO!
Don’t do this. Now you might want to try to reuse your stock Toyota square u-bolts and spring plates but there are four downsides to this:
If you can’t be a normal person and use the proper u-bolts and plates, you should not be doing this swap!
Bumpstops
Chevy 63” springs are loooooooong and flexy. If you’re going to be
flexing them a lot, install bumpstops so that the springs aren’t going
negative. Despite being from a heavier-than-a-Toyota Chevy pickup, you can
still bend them out on the trail without a bumpstop. The stock Toyota
bumpstops are mounted to your spring plate with the stock square
u-bolts.
You can go three ways here:
Spring Pad Shims
If you end up with some taller Chevy 63s, you might need to install
some angled shims between your springs and rear axle to point your
pinion a little bit more toward your transfer case. Some people need
shims and some people don’t. It’s always a good idea to first make sure
that your driveshaft is lubed and that the yokes at the transfer case
and pinion are properly squared to each other (so that they rotate in
phase), since this will help things run smoothly at the greater angle in
which your driveshaft will be operating.
If you do need shims, try something between 2-4 degrees. If you’re replacing your spring perches, you can also just cut off your spring perches, spin your pinion up 2-4 degrees, and weld your perches back on.
What about a driveshaft?
Whether you need a longer driveshaft depends on how centered your axle is in the wheelwell and how much lift you get. With 3” of lift and a centered wheel, you’re probably okay. A taller front hanger, long rear shackle, and 5 leaf Chevy spring pack will likely require a new driveshaft. Likewise, if you move your axle back by moving your front spring hangers back, you’ll need a longer driveshaft.
LSPV (Load Sensing Proportioning Valve)
The LSPV is bolted to your frame above your axle and has a rod that runs down to your rear axle. Your rear brake hardline also runs into and out of the valve. When you slam on the brakes, the rear of your Toyota lifts up and the LSPV decreases the line pressure to your rear brakes. This keeps them from locking up and is safer for you. You could have some issues with the length of the rod that goes from the LSPV to your axle. You might need to extend the rod or relocate its mount on the axle in order to have a fully functioning LSPV.
A common alternative to the stock LSPV is to install an aftermarket
proportioning valve and this is frequently done when swapping to a rear
disc setup. These usually have a dial that you use to adjust how much
pressure is applied to your rear brakes.
The biggest difference is that a proportioning valve is manually set at a single position (effectively one pressure setting) while the stock LSPV permits automatic gradual adjustments when your axle moves while you’re driving.
Installation: Time, Money, and Fabrication Skills
Firstly, you need a welder and this should not be your “Intro to
Welding” project. You need to ensure that your spring hangers are
solidly welded in place so that you don’t rip something off on the trail
or have your truck come apart on the highway. As always, there is a balance between time, money, and skills. Kits cost money, but save you tons of time. It can also be satisfying to work on your truck, build your own parts, and see the fruits of your labor on the trail.
Buy a kit to save time and trouble or if you don’t have a lot of fab skills.
The spring hangers, shackle hangers, spring plates, and shock mounts
aren’t particularly difficult to make, but you still have to source all
the steel, make decisions on design, and do a lot of cutting and
drilling. Many people say they make parts “in an hour or so”, but the reality is that
they either work in a fab shop or they really value invisible internet
street cred. Measuring, estimating, pattern-making, cutting, and drilling can take a tremendous amount of time. It’ll probably take a normal person 1-2 days minimum to put the
brackets together. 63" conversion parts are available piecemeal or in various kits.
You should have a drill press for the large holes or buy parts with large holes premade. If you need to drill several 5/8" holes through 3/8" plate with a hand drill, you'll hate yourself at the end. It's even a little tedious unless you can get your drill speed slow enough which can be problematic on box store drill presses.
If you don’t have a lot of confidence in your welding skills (and this is totally fine, since everyone has to start somewhere), then you can lay everything out, tack weld your spring hangers in place, hang your springs and axle, then pay a mobile welder (or a buddy) to finish welding in your brackets and hangers while it’s in your garage/driveway. The welding shouldn’t be more than $100-$150 depending on your area and the welder’s minimums. The actual work should take around an hour from setup to takedown.
If you don’t weld or have fab skills, at some point you might find out that you’re better off buying a set of bolt-in rear leaf springs or a rear lift kit instead of farming out all the work on your cheap lift springs.
Installing on a Daily Driver
If you’re installing 63” Chevy leaves on your primary vehicle, (aka you need it to get to work every day), you can do this installation piecemeal by installing the Chevy spring hangers and shackle hangers with your Toyota spring and axle components still installed. This works because the Chevy springs are so long that the hangers are installed outside the stock Toyota hangers. Then, when you’re ready, you can pick a day to unbolt your stock Toyota leaves and bolt in the Chevy 63s. This is helpful if you can’t afford a lot of downtime with your truck. There are two issues with this method:
Fuel Tank Interference
The passenger side front spring hanger is installed next to your Toyota’s fuel tank and it’ll prevent you from welding in the hanger on all 4 sides. You have two options to deal with this:
Single Shackle or Double Shackle?
People install double shackles to avoid installing a new rear shackle hanger or to try to get more axle droop, but there is some debate about how double shackle setups handle. Some people that have trucks with a light backend (such as pickups without a bed) often feel that the back tends to unload when braking downhill with a double shackle setup. Others have no problems with this, but you should be aware of it. We don’t have an opinion about this, but if you fourwheel on a lot of hairy downhills that involve a lot of braking, you might want to consider skipping a double shackle setup.
Last updated: September 5, 2019